
A cramped desk covered in tangled cables and wobbly monitor bases isn’t just frustrating, it’s killing your productivity and ergonomics. A dual monitor arm desk mount solves this by lifting both screens off your surface, freeing up workspace while letting you position displays exactly where you need them. Whether you’re upgrading a home office or finally tackling that cable nightmare, the right dual monitor arm transforms how you work. This guide walks through what makes a quality mount, how to pick one that fits your setup, and the step-by-step process to install it without punching unnecessary holes in your desk.
Key Takeaways
- A dual monitor arm frees up 8 to 12 inches of desk depth while enabling precise ergonomic positioning to reduce neck strain and eye fatigue.
- Choose a dual monitor arm with weight capacity 20% above your combined monitor weight and verify VESA compatibility (75×75 mm, 100×100 mm, or 200×200 mm patterns) before purchasing.
- Clamp mounts offer flexibility for most desks, while grommet and wall mounts provide permanent, cleaner installations for committed workspaces.
- Proper cable routing through integrated arm channels and correct tension adjustment are critical for stability and long-term durability.
- Position monitor tops at eye level with 20- to 30-inch viewing distance and tilt screens back 10 to 20 degrees to maintain neutral neck posture and minimize glare.
What Is a Dual Monitor Arm and Why You Need One
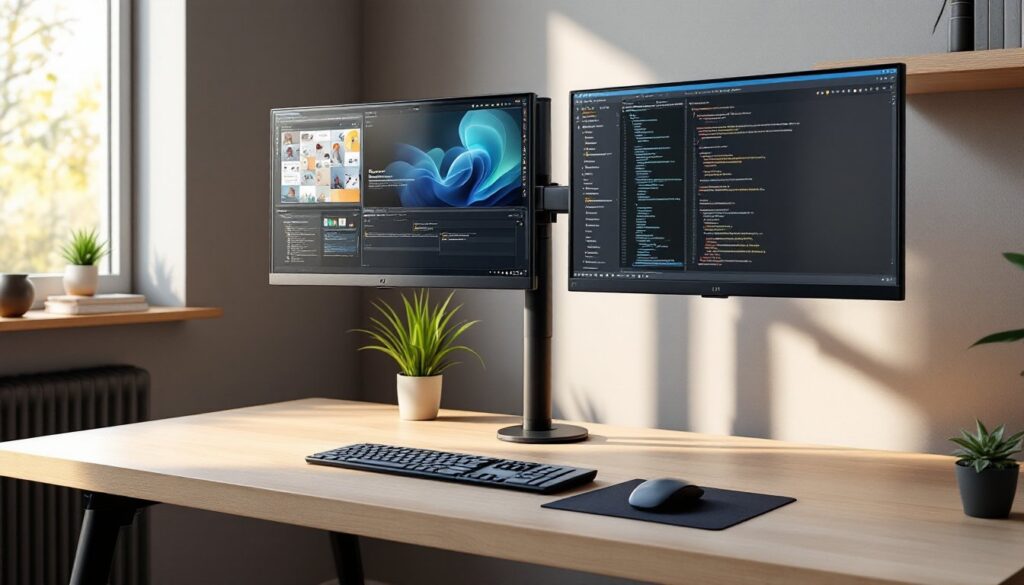
A dual monitor arm (also called a double monitor arm or dual arm monitor stand) is a mechanical mounting system that holds two displays using articulating joints and arms. Unlike fixed stands, these mounts attach to your desk or wall and let you tilt, swivel, rotate, and adjust height independently or in tandem.
The benefits go beyond aesthetics. First, you reclaim 8 to 12 inches of desk depth that monitor bases otherwise occupy, critical real estate for keyboards, notebooks, or just elbow room. Second, you gain precise ergonomic control. Most stock stands offer limited tilt and no height adjustment, forcing you to crane your neck or stack books underneath. A monitor dual arm lets you dial in the perfect eye level and viewing angle, reducing neck strain and eye fatigue during long work sessions.
Third, cable management becomes straightforward. Quality arms include integrated channels or clips that route power and video cables along the arm structure, keeping them off your desktop and out of sight. Finally, flexibility matters when you shift between tasks, pull one screen closer for detailed CAD work, push it back for video calls, or swing both aside when you need the full desk for sketching or assembly.
If you’re running a dual-screen workflow at home, whether for design, coding, day trading, or just splitting email from research, a dual arm monitor mount is the single best upgrade for comfort and workspace efficiency.
Key Features to Look for When Choosing a Dual Monitor Arm
Not all dual monitor arms are built the same. Picking the wrong one means sagging screens, wobbly adjustments, or a mount that won’t even fit your monitors. Focus on these core features before you buy.
Weight Capacity and Monitor Compatibility
Weight capacity is the first hard limit. Most dual arms support 4.4 to 19.8 lbs per monitor, but heavier gaming or professional displays (27-inch and up, especially curved panels) can hit 15 to 20 lbs each. Check your monitor’s weight in the manufacturer’s spec sheet, don’t guess. If your screens are near the upper limit, choose an arm rated 20% above the combined weight for longevity and stable positioning.
VESA mounting is the universal standard. Nearly all monitors use VESA hole patterns, 75×75 mm or 100×100 mm are most common, with some larger displays using 200×200 mm. Your mount must match or include adapter brackets. Flip your monitor over or check the manual to confirm the pattern before ordering.
Screen size range matters too. Arms list compatible sizes (typically 13 to 32 inches), but size alone doesn’t tell the whole story, a lightweight 32-inch panel may work fine, while a hefty 27-inch ultrawide won’t. Weight is the real constraint.
Mounting Options: Clamp vs. Grommet vs. Wall Mount
How you attach the arm to your workspace depends on your desk construction and available space.
Clamp mounts are the most common. A C-clamp grips the desk edge with a screw-tightened mechanism, requiring 1 to 4 inches of edge clearance and a desk thickness between 0.4 and 3.9 inches. They work on most desks and leave no permanent marks. But, they won’t fit desks with lips, raised edges, or glass tops without a reinforcement plate.
Grommet mounts bolt through a hole drilled in your desk, typically a 0.4 to 2.4-inch diameter hole. This provides a rock-solid anchor and a cleaner look with no clamp visible. It’s ideal for custom workstations or standing desks where you want permanent placement. The downside? You’re drilling into your desk, so measure twice and commit once. If you’re renting or using a desk you can’t modify, skip this option.
Wall mounts attach directly to wall studs using lag bolts, ideal for ultra-minimal setups or when desk space is nonexistent. You’ll need to locate studs with a finder and ensure the mount reaches your seated eye level when extended. Wall mounting requires more planning, cable routing is trickier, and repositioning means patching drywall holes.
Most home office ergonomic setups favor clamp mounts for flexibility, but grommet and wall options suit committed installations where stability and clean lines matter most.
Step-by-Step Installation Guide for Your Dual Monitor Arm
Installing a dual arm monitor stand takes about 30 to 45 minutes with the right prep. Here’s how to do it safely and cleanly.
Tools and materials:
- Dual monitor arm kit (with all mounting hardware)
- Allen wrenches or hex keys (usually included)
- Adjustable wrench or socket set
- Phillips screwdriver
- Stud finder (for wall mounts)
- Level
- Tape measure
- Pencil
- Cable ties or Velcro straps
- Safety glasses (when drilling)
Step 1: Clear and prep the desk. Remove monitors, cables, and anything within 2 feet of the mounting area. Wipe down the desk edge to ensure a solid grip for clamps.
Step 2: Assemble the base mount. Follow the manufacturer’s instructions to attach the base plate or pole to the clamp or grommet hardware. Hand-tighten first, then snug with a wrench, don’t overtighten and crack the desk surface. Position the clamp so the arm’s range of motion won’t hit walls, shelves, or your chair.
Step 3: Attach the arm(s) to the base pole. Most dual monitor arms use a central vertical pole with two articulating arms. Slide arms onto the pole at roughly the height you’ll need (you’ll fine-tune later). Tighten set screws with the included hex key.
Step 4: Mount the VESA plates to your monitors. Remove existing monitor stands (check the manual, some require a screwdriver to release). Align the VESA plate with the holes on the back of each monitor and secure with the provided screws. Use the correct screw length, too long and you risk damaging internal components. Finger-tighten first, then snug with a screwdriver.
Step 5: Attach monitors to the arms. With a helper (monitors are awkward and top-heavy), hook or slide each monitor’s VESA plate onto the arm mount. Most use a quick-release bracket. Lock the safety latch or tighten the retention screw.
Step 6: Adjust tension. Before you dial in your final positioning, set the tension screws on each arm so monitors stay put when you let go but still move with light pressure. This usually requires a hex key and some trial and error, tighten if the monitor sags, loosen if it’s too stiff.
Step 7: Route cables. Run power, HDMI, DisplayPort, and USB cables through the arm’s integrated channels or attach them with cable clips along the arm. Leave a small service loop at joints to avoid strain during movement. Secure bundles at the base with Velcro straps.
Step 8: Level and position. Use a level to check that both monitors sit evenly. Adjust height and angle to match your seated eye level (more on this in the next section).
Safety note: Always wear safety glasses when drilling for grommet or wall mounts. If wall-mounting, use a stud finder and lag bolts rated for at least 50 lbs per stud. Never rely on drywall anchors alone for a dual monitor arm, they will fail.
Optimizing Your Workspace: Ergonomic Positioning Tips
Once installed, the best dual monitor arm is useless if your screens are positioned wrong. Proper ergonomic setup reduces strain and keeps you comfortable through marathon work sessions.
Eye level and distance: The top edge of your primary monitor should sit at or slightly below eye level when you’re seated upright. This keeps your neck in a neutral position. If you’re using one screen more than the other, center that one directly in front of you and angle the secondary screen 20 to 30 degrees to the side. Both monitors should be 20 to 30 inches from your eyes, about an arm’s length. If you find yourself leaning forward, pull the screens closer or increase font size.
Tilt and angle: Tilt each screen back 10 to 20 degrees to reduce glare from overhead lighting and match your natural downward gaze. Avoid extreme angles that force you to crane your neck up or down. If glare persists, adjust the arm to rotate the screen away from windows or add a desk lamp with diffused light.
Height symmetry: Unless you have a specific workflow reason (like referencing documents on a lower screen), keep both monitors at the same height. Mismatched heights force constant neck adjustment and lead to fatigue. Use the arm’s height adjustment to make fine tweaks, most arms have a vertical travel range of 10 to 16 inches.
Cable slack: Leave enough cable length at each joint so screens can move through their full range without yanking connectors. Too-tight cables either limit motion or pull connectors loose over time.
Many ergonomic workstation guides recommend taking breaks every 45 to 60 minutes to stand, stretch, and reset your posture. Even the best dual arm monitor mount can’t fix sitting still for hours.
If you’re experiencing persistent neck or shoulder pain after adjusting your setup, consider whether your chair height, keyboard position, or desk height need tweaking. A well-reviewed task chair with lumbar support and adjustable armrests completes the ergonomic picture, monitor arms are part of the solution, not the whole fix.
Conclusion
A dual monitor arm stand clears clutter, improves posture, and gives you the flexibility to adjust your workspace on the fly. Pick a mount that matches your monitors’ weight and VESA pattern, choose the right attachment method for your desk, and take your time with installation, proper cable routing and tension adjustment make all the difference. Once it’s dialed in, you’ll wonder how you ever worked with monitors on fixed bases.