
Whether you’re upgrading to a newer model, moving to a new house, or switching security systems entirely, knowing how to remove a Ring doorbell properly saves time and prevents damage to your siding or brick. The process varies slightly depending on whether you have a battery-powered or hardwired unit, but neither requires advanced electrical skills. With the right tools and a few minutes, anyone can detach a Ring doorbell safely. This guide walks through both removal methods, covers what to do with the mounting hardware, and explains how to patch the wall so you’re not left with screw holes or wiring exposed to the elements.
Key Takeaways
- Removing a Ring doorbell properly prevents damage to siding or brick, and the process takes under five minutes for battery-powered models with just a screwdriver and Torx T15 security bit.
- Always turn off power at the circuit breaker and confirm it with a voltage tester before disconnecting wires on hardwired Ring doorbell models to ensure safety.
- After removal, cap all wire ends with electrical tape or wire nuts, fill mounting screw holes with exterior caulk or spackle, and touch up with paint to avoid leaving exposed holes and wiring.
- Battery-powered Ring doorbells snap off their mounting brackets once the security screw is removed, while hardwired models require disconnecting 16V-24V AC wires from screw terminals or push connectors.
- Before selling or gifting your removed Ring doorbell, factory-reset the device through the app, remove it from your account, and include the original bracket, screws, and packaging to maximize resale value.
Tools and Materials You’ll Need
Before starting, gather everything in one spot. Most Ring doorbell removals need:
Tools:
- Phillips-head screwdriver or Torx T15 security bit (depending on your Ring model, Pro models typically use security screws)
- Flathead screwdriver (for prying the faceplate off gently)
- Wire strippers (hardwired models only)
- Voltage tester or non-contact voltage detector (hardwired models only, critical for safety)
- Drill with masonry bit (if filling screw holes in brick or stucco)
Materials:
- Electrical tape (to cap wires after disconnection)
- Wire nuts (optional, for capping low-voltage wires)
- Spackle or exterior caulk (to fill mounting holes)
- Sandpaper (120-grit, for smoothing patched surfaces)
- Touch-up paint (matching your door trim or siding)
Safety gear:
- Safety glasses (protect against dust or debris when unscrewing from masonry)
- Work gloves (optional, but helpful when handling metal brackets)
Having a small container or ziplock bag to hold screws prevents them from rolling into grass or down a deck crack.
How to Remove a Battery-Powered Ring Doorbell
Battery-powered Ring models (including the Ring Video Doorbell, Ring Video Doorbell 2, 3, and 4) mount to a bracket secured with screws. The doorbell itself snaps onto the bracket, making removal straightforward.
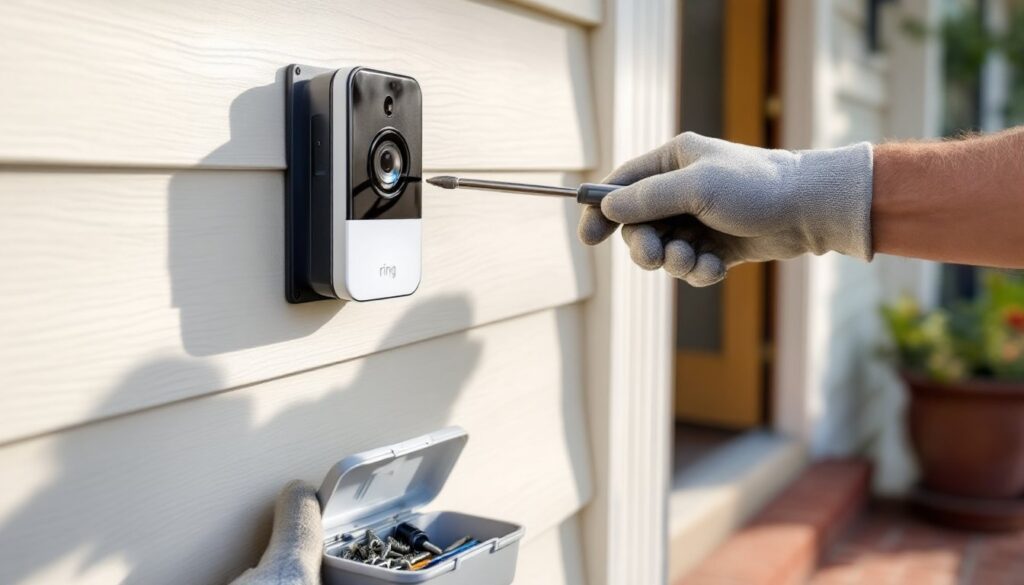
Step 1: Locate the small security screw at the bottom of the Ring doorbell faceplate. This screw prevents theft and holds the device to the mounting bracket. Most models use a star-shaped Torx T15 bit. If you don’t have one, a small precision screwdriver set usually includes it.
Step 2: Unscrew and remove the security screw. Set it aside in your container, you’ll need it if reinstalling.
Step 3: Grip the doorbell body firmly and pull it straight toward you. The device should slide off the mounting bracket. If it feels stuck, gently wiggle it up and down while pulling. Don’t force it: check that the security screw is fully removed.
Step 4: Once detached, remove the battery pack if you plan to reuse the doorbell elsewhere or sell it. Press the quick-release tab on the back and slide the battery out.
Step 5: Unscrew the mounting bracket from the wall. Most brackets attach with two to four screws directly into the door frame, siding, or brick. Use a Phillips-head screwdriver for standard screws. If mounted on brick or masonry, you may need to apply steady pressure, screws in plastic anchors can bind as you back them out.
That’s it for battery models. The entire process takes under five minutes.
How to Remove a Hardwired Ring Doorbell
Hardwired Ring models, such as the Ring Video Doorbell Pro, Pro 2, and Elite, connect to your existing doorbell wiring (typically 16V to 24V AC). These require an extra safety step before you touch any wires.
Turning Off Power at the Circuit Breaker
Never assume low-voltage wiring is safe. Even doorbell transformers can deliver a shock or cause a short if wires touch.
Step 1: Locate your home’s main electrical panel and identify the breaker controlling the doorbell transformer. In most homes, the doorbell shares a circuit with interior lighting or outlets. If you’re unsure, flip breakers one at a time and test the doorbell button until it stops working. Label the breaker once you find it.
Step 2: Turn off the breaker. Use a non-contact voltage tester at the doorbell wires to confirm power is off. Hold the tester near the wire terminals, if it beeps or lights up, power is still present. Double-check the breaker.
Step 3: Once confirmed dead, proceed to remove the doorbell faceplate. Hardwired models typically have a faceplate that snaps off or is held by a small set screw. Consult your model’s quick-start guide if unsure.
Disconnecting the Wiring
Step 4: Behind the faceplate, you’ll see two or more thin wires (usually 18-gauge or 20-gauge) connected to screw terminals or push connectors on the back of the Ring doorbell. Note which wire goes where, take a quick photo with your phone for reference if you plan to reinstall or connect a new doorbell.
Step 5: Loosen the terminal screws with a small flathead or Phillips screwdriver and pull the wires free. If your model uses push-fit connectors, press the release tab and pull the wire out.
Step 6: Cap each wire end with electrical tape or twist on a small wire nut. This prevents accidental contact and keeps moisture out if the wires will sit exposed for any length of time. Tuck the wires back into the wall cavity or junction box.
Step 7: Remove the mounting bracket by unscrewing it from the wall. Hardwired Pro models often mount to a small metal or plastic plate anchored with screws. Save the bracket if you’re installing a replacement Ring or another brand that might reuse the same footprint.
Step 8: Turn the breaker back on once the doorbell is fully removed and wires are capped.
Removing the Mounting Bracket and Filling Holes
Once the Ring doorbell itself is off, you’re left with the mounting bracket and screw holes. If you’re installing a different doorbell or leaving the spot empty, you’ll want to clean up the surface.
Removing the bracket: Most Ring mounting plates attach with two to four screws. Battery models use standard wood screws or masonry anchors. Hardwired models may have a metal backplate secured with machine screws. Unscrew and remove the bracket. If screws are stripped or stuck in masonry, apply penetrating oil (like WD-40), wait five minutes, then try again with steady pressure.
Filling screw holes in wood or composite: Use exterior-grade spackle or wood filler. Apply with a putty knife, slightly overfilling the hole. Let it dry per the manufacturer’s instructions (usually 1-2 hours), then sand smooth with 120-grit sandpaper. Prime and paint to match your trim.
Filling holes in brick, stucco, or masonry: For brick, use exterior caulk or mortar patch depending on hole size. Small screw holes (under ¼ inch) can be filled with paintable caulk. Larger holes or anchor cavities need mortar patch, mix a small batch, press it into the hole with a putty knife, and smooth flush with the brick face. Let it cure for 24 hours before painting.
Dealing with wall anchors: If plastic anchors remain in the wall, try unscrewing them counterclockwise with pliers. If they spin, gently pry them out with a flathead screwdriver or tap them below the surface and spackle over them.
Paint touch-up: Match your door trim or siding color. Most home centers offer sample-size paint jars. Apply with a small brush, feathering the edges so the repair blends in. Two thin coats beat one heavy coat.
If you’re concerned about smart home device reviews before choosing a replacement, taking time to research ensures you pick the right fit for your home security setup.
What to Do After Removal: Reinstallation and Selling Tips
After you’ve successfully taken off a Ring doorbell, you have a few options depending on your plans.
Reinstalling at a new location: If you’re moving or repositioning the doorbell, factory-reset the device through the Ring app before reinstalling. This clears saved Wi-Fi credentials and allows you to set it up fresh. Battery models are the easiest to relocate, just mount the new bracket, snap the doorbell on, and reconnect to Wi-Fi. Hardwired models require a compatible doorbell transformer (16V-24V AC) at the new location. Many installation guides walk through transformer compatibility and proper voltage.
Preparing the doorbell for sale or gifting: Remove the device from your Ring account via the app (Settings > General Settings > Remove This Device). Wipe it down with a microfiber cloth and rubbing alcohol. Include the original mounting bracket, screws, and any adapters or faceplates. If you still have the box and quick-start guide, include those, it increases resale value on platforms like Facebook Marketplace or eBay.
Switching to a different doorbell system: If you’re moving away from Ring entirely, make sure any new doorbell is compatible with your existing wiring or mounting footprint. Most video doorbells require similar voltage (16V-24V AC) and use standard two-wire setups. If you’re exploring alternatives, current smart home technology trends cover a wide range of features including local storage, higher resolution, and no-subscription options.
Leaving the spot empty: If you’re not replacing the doorbell, cap and tuck the wires (for hardwired setups), fill all screw holes, and paint the area. Consider installing a simple wired doorbell button if you still want a functioning chime, they cost under $10 and take five minutes to wire in.
Whichever path you take, properly removing and handling your Ring doorbell ensures a clean transition and preserves your home’s exterior.